Showing posts with label organization. Show all posts

Monday, April 25, 2022

Staying on Track


 I don't know what your workshop looks like, but mine is a mess of started projects.  I get inspired and start something new, but before it gets finished, inspiration hits again!  And a new project gets added.

I realized I needed a way to keep myself on track.  Also, I wanted to have a place to remind myself of new projects I wanted to do, without another pile of papers and fabric cluttering up my workspace.

After some research and prayer, I decided on a corkboard. Because of the shape I wanted, I made my own. I found some cork tiles at a good price, but I didn't want to attach them directly to the wallpaper. I also had a box of promotional yardsticks I could use as a frame.

So Steve got to work bringing my vision into reality.  We cut and spray painted the yardsticks.  He found some heavy cardboard that he cut to the shape we wanted.  Then he glued the cork and frame to the cardboard.  With a couple of screws, he attached it to the wall at the entrance to my studio, under my new banner.  I finished it with a declaration.

The Lord blesses the work of my hands, so everything I set my hands to prospers.

Now, every day when I go into my studio, I see what projects I have going.  Those are the ones I need to finish before I start on another one. I am reminded that there is a purpose for each of these projects and I have the grace I need to finish them.  I also have room to post new and upcoming projects. 

 I have to admit that this little board has helped keep me focused and on track.  I've even finished a few projects just so I could remove them from the board!

The Father has given us creative talents that are meant to be shared with the world.  That means projects have to be completed, so they can be placed in the hands they were intended for.  An incomplete quilt or table runner is not blessing anyone shoved aside in a corner of my studio.

And that is the ultimate goal of any quilter: to bless someone with the work of our hands.  

For me, my new corkboard is a tool to achieve that goal.  What do you use to keep your projects organized?


"You shall give to him freely, and your heart shall not be grudging when you give to him, because for this the Lord your God will bless you in all your work and in all that you undertake." Deuteronomy 15:10


Friday, December 10, 2021

Focus on Finishing


 Every year I choose one word for the year. It is sort of a guiding light, a theme, or a focal point for the year.  This year my word was FOCUS.

Focus on Finishing is my theme for December.

These frogs that live on my porch were the first project.  I made them years ago and they had gotten quite dirty and needed a makeover.

Every morning, as I went out for my coffee and time with Jesus, I would say to myself: I need to clean those up, but I never got to it.

This year as we were decorating the porch for Christmas, Steve commented they needed Christmas outfits, their summer ones were out of place with the other decorating he was doing.

I wholeheartedly agreed and promptly went to my stash to see what I could find. Fortunately, I found the original pattern, so I didn't have to design all their clothes from scratch. I was pleased to find big enough pieces of a red and white stripe with gold accents and some solid red to dress them in.  I used scraps of fur for the hats and her muff.  There was even enough to make a small banner to hang with them.

Steve was very happy with how they turned out and deemed them worthy of a place on our Christmas porch. I think these outfits will be good until Valentine's Day, just need a different banner and a heart or two. And now their summer clothes are washed and ready to go.

So far my Focus on Finishing is going good.  Besides cleaning up these frogs, I've glued a chair back together, finished a sewing project for a friend that had been started at the beginning of the year, and made a plan for finishing other UFOs in the studio.

Finishing up projects or at least having a solid plan to finish them is a great way to end the year.  Facing all those unfinished projects sitting in my studio is a creativity killer.  Seeing those small projects around the house I haven't gotten around to zaps my energy.  By focusing on finishing up those projects, I am making more time and room for new ideas and inspiration.  Finishing them didn't take much time, but the relief of not having them "hanging over my head" was very freeing.

Do you have small, unfinished projects that are zapping your creative energy?   Make December this year is your time to Focus on Finishing.  Let's all start the new year out with room for our imagination and creativity to flow.


Wednesday, April 7, 2021

Spring Cleaning in your Sewing Room

 Hey, it's Spring and time for Spring Cleaning!  Anybody excited?


I didn't think so.  But it's got to be done.  Spring cleaning in the sewing room is just like in any other room of your home with some additional things to do.

Start with the basic room cleaning stuff, walls, windows, floors, and ceilings.  You can find this list in  Cleaning for the Dream Guide and Worksheets PDF at jodelights.com.

Then there are special items in the sewing room.  I suggest you keep a shopping list (also found in the Cleaning for the Dream) for any items that you want to replace.  Here is a checklist to get you started.  This page is now included with the PDF guide.

  • Use room by room list for floors, walls, and ceilings. etc
  • clean machines
  • sort and discard bent or rusted pins and needles
  • clean iron
  • clean or replace ironing board cover
  • sharpen or replace cutting blades and scissors
  • clean cutting table and mats
  • clean design board
  • clean quilt frames
  • dust bookshelves, sort and discard magazines or books you won't use
  • clean TV and remotes
  • clean your computer, purge unwanted files and Pinterest pin
  • clean supply bins
  • sort and reorganize fabrics and batting
  • clean coffee pot and snack area
You may have other items you will need to clean depending on your space.  I don't do everything on this list and you don't have to either.  I only sort and organize my fabric every five or so years.  I clean my iron and sewing machines more often than once a year.  I only discard magazines and books when the shelf starts to bend or break.


"You're off to great places!  Today is your day!  Your mountain is waiting!
So...get on your way!" - Dr, Suess


Thursday, September 17, 2020

10 Creative Ways to Display Quilts


Do you have some quilts are hidden away because you don't know what to do with them?  They may be tucked away in closets and drawers to keep them safe.  My mom keeps hers between the box springs and the mattress of her bed.


It's time to see them free!  Quilts aren't just some plain old blanket - they are works of art!  They were lovingly created to be used and seen.  They should be admired for the skill that created them and embraces the love that inspired them.  Chances are they have precious memories for you.  Let's get them out of hiding and let them share the love they hold.


I have quilts displayed in every room of my house except the kitchen.  I realize that may not work with everyone's décor, but hopefully, these ideas will inspire you to set your quilts free, where they can be appreciated.


 Hang them:


💖Wood hanger with marbles.

I love these hangers!  They come unfinished so you can stain or paint them.  To use you just insert the quilt upward in the slot past the marble.  To remove the quilt, pull out sideways.


💖Wall shelf with hanging sleeve board.                                                                              You can use these even if your quilt doesn't have a sleeve.  Just fold it over the board.


💖Use a decorative curtain rod.                                                                                            This a wooden one, but I have used metal ones also. Fold the quilt over the rod and secure it at the sides.                                                                           


💖Quilt ladder                                                                                                                            A quilt ladder is a great way to display several quilts at a time.                                                                


💖 Floor Quilt Rack                                                                                                                       There are a lot of these to choose from.  They can be painted or stained to fit any decor. They are great to set in a corner or at the foot of the bed.


💖Stack on a chair                                                                                                                     I have these stacked on an antique lawn chair on the porch.  When the weather gets cooler, we can just grab one and wrap up.                                                                                                         


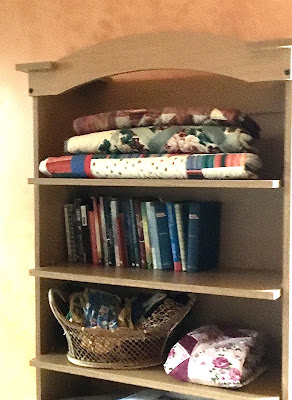
💖Stack on a bookshelf                                                                                                              


I saw this display on the web.  Beautiful!


💖Fold in a basket                                                                                                                      A large wicker basket holds several bigger quilts.  This old picnic basket is perfect smaller quilts or table runners.


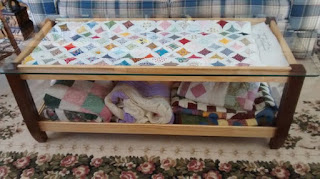
💖Coffee table                                                                                                                            This is a clever idea, the quilt is displayed on a coffee table under glass.  The shelf below holds more quilts to snuggle up in.


💖Use as a table cloth                                                                                                            


I'm sure with a little bit of creative thinking you will discover unique ways to display your quilts.  I'd love to hear about them, so drop a line in the comments section below!


 "Creative clutter is more blessed than tidy idleness."


Monday, March 30, 2020

Workshop Tour

My sewing studio-Atelier 54

I am so excited to share my sewing space with you!  After months of working a bit at a time, my workshop, Atelier 54, is mostly ready to go.  I still have some finishing touches to do, but it is organized and set to sew! 

I'm blessed to have a large room in our basement to work with.  My husband wanted me to paint the walls a bright color, but I wanted to stick with white.  That way the true colors of the fabrics are seen and not compromised when I take pictures.  My office upstairs is painted apricot and every picture taken there has an orange tinge.

My sewing desk was in the room when we bought the house.  It must have been built in the room, because it is too big to fit through the door.  I  painted it and added a vintage sewing picture to the front.


Against the wall, i placed a board over another desk to hold a cutting board for  trimming and a small press mat.  In the corner of the two desks, I have a filing cabinet for patterns.


 Vintage thread and ironing advertisement decorate the walls with shelves for sewing treasures and supplies.


There is a pegboard in the corner to hold my quilting stencils.


The pressing station is a board covered with batting and heavy canvas set on top of a dresser.  The top drawer contains pressing aids and the bottom two has hopeful projects and UFO's.


The back wall has quilting fabrics colorized with the black fabric bins holding smaller pieces.

Backing fabrics  are in the black shelves with serger, on top.

Novelty fabrics are housed in cubbies with thread  racks on top and small see through tubes that contain notions.

Under shelf is storage for interfacing, batting, bins for yarn and needlework projects, etc.


I'm not a fabric hoarder.
 I am the curator of an extensive textile collection!


Cutting area has pegboard for rulers and cutting tools.  I also have clips to hang notes and book holder if I am using pattern from book or a magazine.


Next to the cutting area is my design area.  The design wall was made from foam board, batting and covered it in flannel.


Completing the design area is a desk for quilt design, art journaling and scrapbooking.

There was an old fashioned pencil sharpener  already mounted to the wall.  That is perfect since I am always losing my sharpeners.


A bookcase holds my collection of quilting and sewing books and magazines.


I hope this tour inspires you and gives you some ideas for your space.  I can't wait to get started sewing in this space!  You can see a bit of my first project on the design wall, a quilt I'm calling Fan Dance.
I'll post here when the pattern and quilt is available.

Until next time...


Tuesday, February 11, 2020

The Purge is Done!


I'm so excited to announce that step one of reclaiming my space is done.  All fabrics have been gone thru twice.  The first  time was an easy sort.  The second was a little bit harder.  I didn't want to give up ANY piece of fabric, but I decided I couldn't keep it all.  So I asked myself these questions…

  • Do I like it?
  • Do I love it?
  • Will I use it in the next 2 years?
  • Is it big enough for a project?
  • Why am I keeping it?
  • Can someone else use it?


I ended up purging about 1/3 of my fashion fabrics, which was easier than my quilting cottons.  I only purged about 1/8 of my those fabrics.  As I organize what is left, I'll probably be able to let go of some more.  My goal is to know what I have and make room for more of what I will actually use.
I'll be sending some of the fabrics to a group that make quilts for charity and the rest will go to the Idea Store.
Now onto step two, getting it all organized!  I've been scouring Pinterest for ideas and will report back to you what works and doesn't work.
 Until then, 


The best kind of sleep beneath heaven above
Is a under a quilt, handmade with love.